


HOW TO: 10 Ways To Wear Eyeliner for Everyday Looks
how many eyeliner looks do people usually wear? one? two? maybe i'm the odd one out, i wear way more than that. most of the looks i share this time are actually looks that i wear personally, what i mean is, i went out rocking these looks. i'm not that keen on showing the more fancy but impractical eyeliner looks for now (i'll save that for halloween), so here are 10 different variations you can try out for real.
as always, remember to tweak the looks to suit your eye shape! not every look suits me, in my opinion the invisible eyeliner looks really bad on me because my double lids are too thick, however it looks really really good on people with narrower lids. same for the k-pop eyeliner, it'll suit someone with longer eyes.
watch the video here!
PRODUCTS USED____________________________________________________________
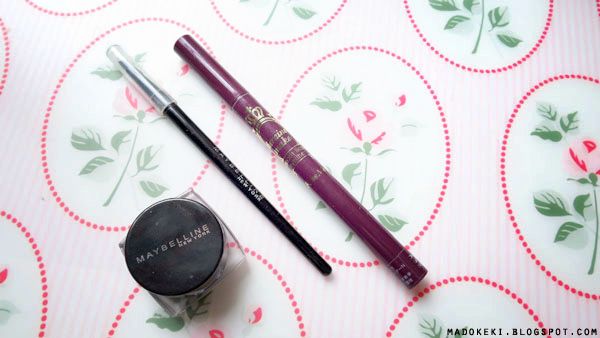
eyeliners used
from left to right:
1. maybelline eye studio gel liner (black)
2. maybelline eye liner brush
3. heroine make smooth liquid liner (black)
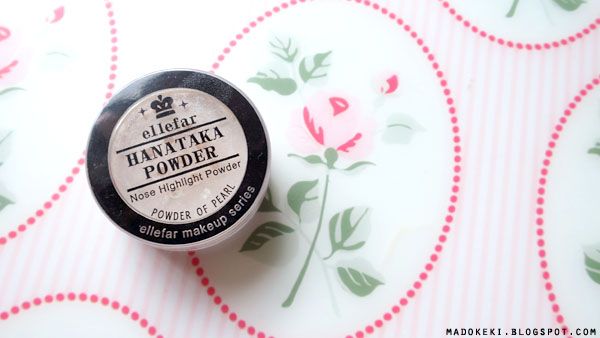
on my eyes: daiso ellefar nose highlighting powder
i wore this as an eyeshadow, just a slight wash of reflective pearlescent powder on my eyes to make them brighter and to show you the contrast of the black eyeliner better.
PICTORIAL_________________________________________________________________
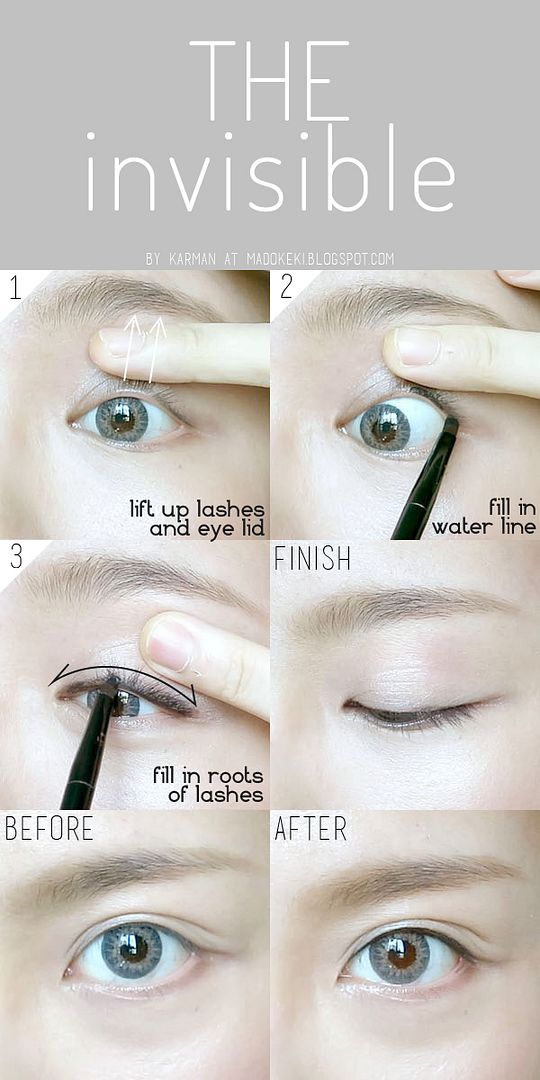
1. THE INVISIBLE EYELINER
the key is to line the water line (also called tight lining) and to fill in the empty spaces between the lashes. very suitable for people with not much lid space (narrow double lids or single lids). this gives the illusion of fuller looking lashes, hence defining and enlarging the eyes every so subtly.
click on image to enlarge!
2. THE NATURAL EYELINER
this is probably the most worn eyeliner i usually wear. it outlines the eye but keeps it looking natural. it also elongates the eye proportionately so you still retain most of your natural eye shape. very suitable for people with narrow eyelids, you'll like to keep the eyeliner really fine and thicken it only at parts where your lid is wider (usually towards the outer half of your eye).
what's interesting is even though we draw a horizontal line (with eyes half open), when you fully open your eyes it'll look like it's pointing downwards slightly. that's just the natural contour of your eyes (that's why this eyeliner look is able to retain your natural eye shape), i find that it's easiest to describe a horizontal line than to give you fancy angles like 093 degree (bearings).

click on image to enlarge!
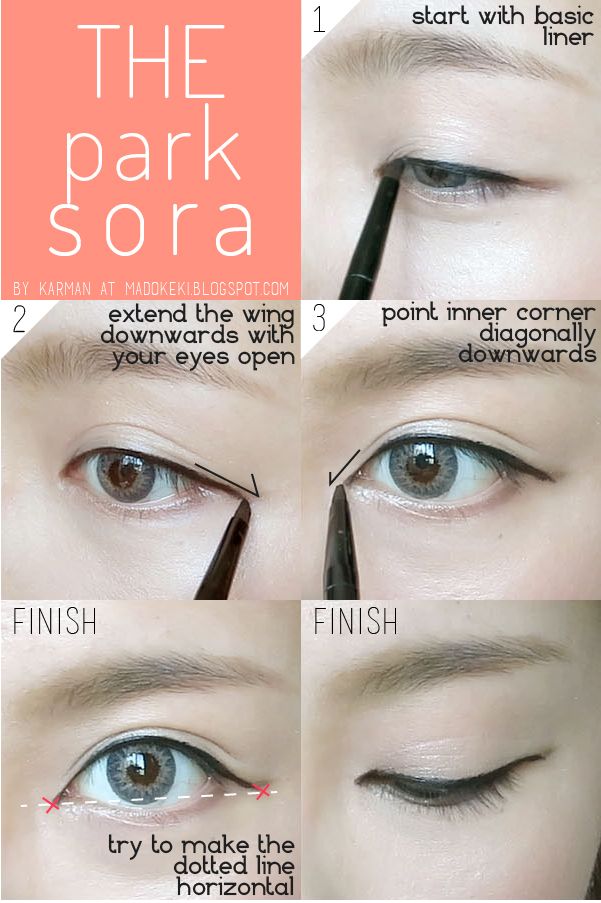
3. THE PARK SORA EYELINER
i wonder how it's like to have an eyeliner look named after myself.. i named this the park sora eyeliner because this is the kind of eyeliner she rocks, i've done a tutorial on that before if you're interested.
this look aims to lenghten your eyes by extending the tail of the eyeliner diagonally downwards. equal attention has to be paid to the inner corners as well because park sora has very close set eyes, so if you want to look like her you'll need to define your inner corners (unless you have her kind of eye shape).
click on image to enlarge!
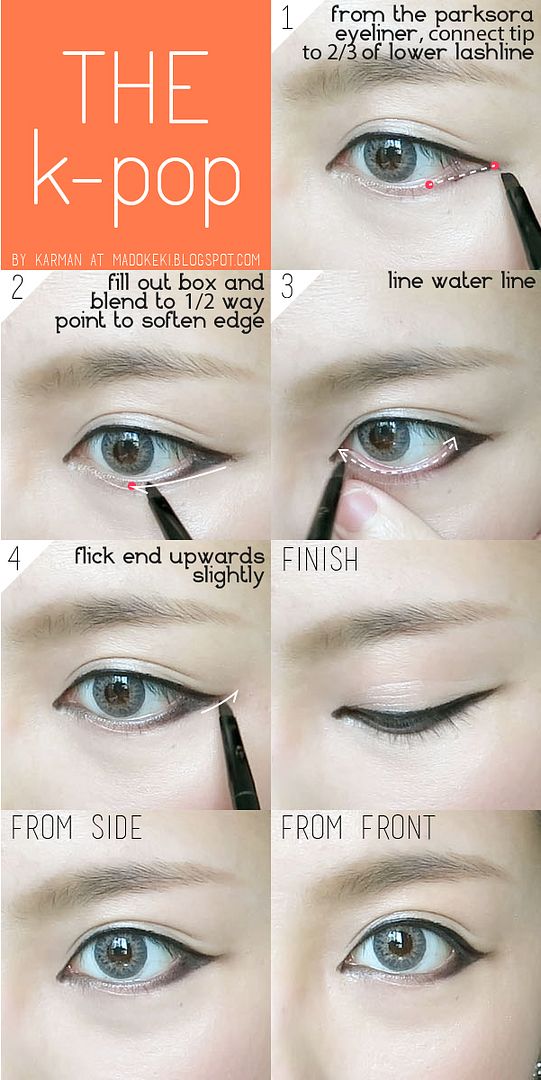
4. THE K-POP EYELINER
it's all about the strong and bold eyeliner, especially the lower eyeline. i feel that that's the signature k-pop look. they always have really long and strong eyes, and the secret is in lenghtening the eyes by two ways: extending the tail of the eyeliner, and to make the eyes look proportionately longer by lining the lower water line too.
this look doesn't really suit my eyes as i have some slightly droopy upper lid, i had no choice but to make the end flick up slightly. if you have narrow double lids, this look will suit you perfectly as you will be able to keep the eyeliner tail really straight.
click on image to enlarge!
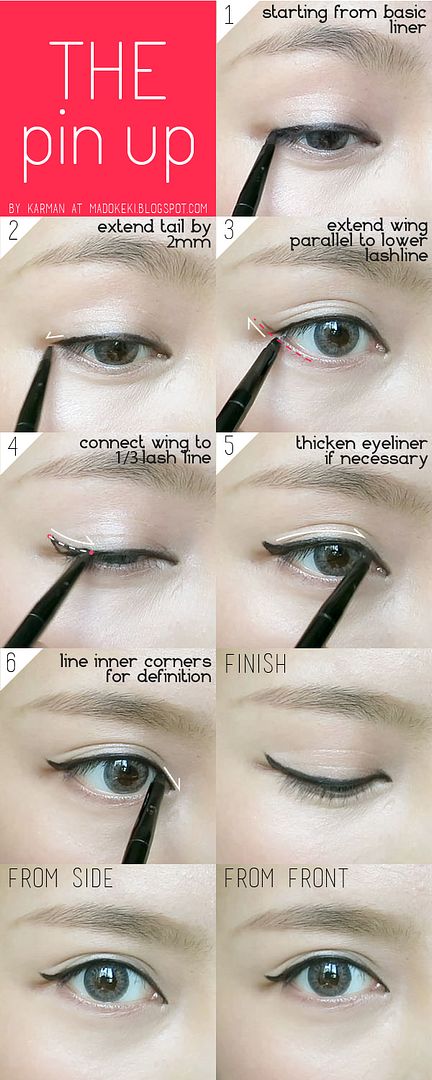
5. THE PIN UP EYELINER
the classic pin up look, originally i wanted to call this the kitten look because it is indeed a cute little cat eye look. this look lifts your eyes up slightly and make it look proportionately rounder.
so classy, i love it. the only problem i usually face is getting the wing to be of the same angle on both sides. i found the perfect trick to achieving that - extend the wing that is parallel to your lower lash line when your eyes are wide open. there's no way you can go wrong with this method.
click on image to enlarge!
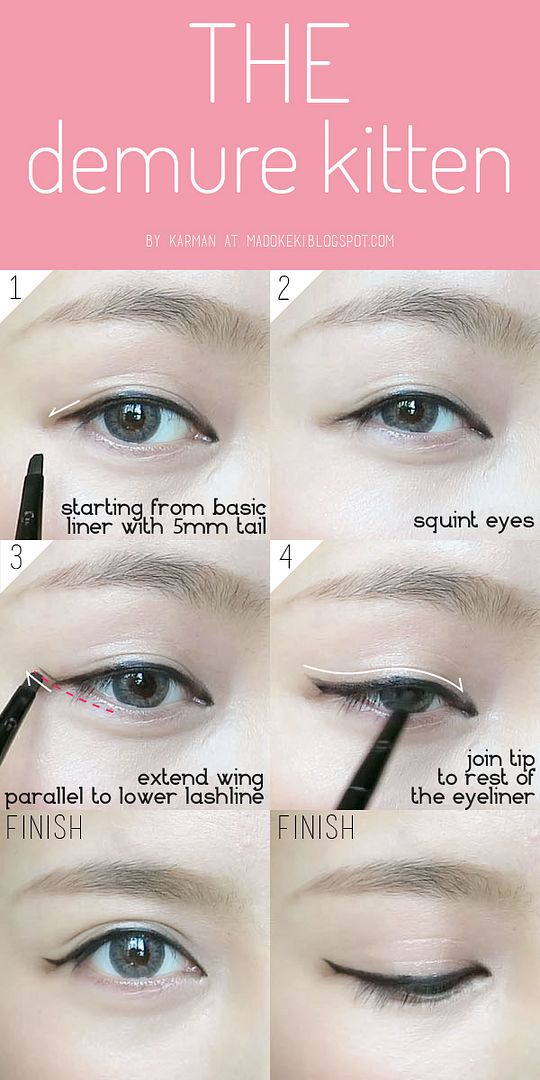
6. THE DEMURE KITTEN EYELINER
this is a little different from the pin up eyeliner in a sense that.. this elongates your eyes while the former makes your eyes look rounder.
by lengthening the tail of the basic liner, you already lengthened your eyes. the angle of your lower lash line is wider when you squint your eyes, the resulting wing also contributes to the lengthening effect.
suitable for people with hooded lids as the wing is further down your eye (and hopefully it can escape the eyelid folds).
click on image to enlarge!
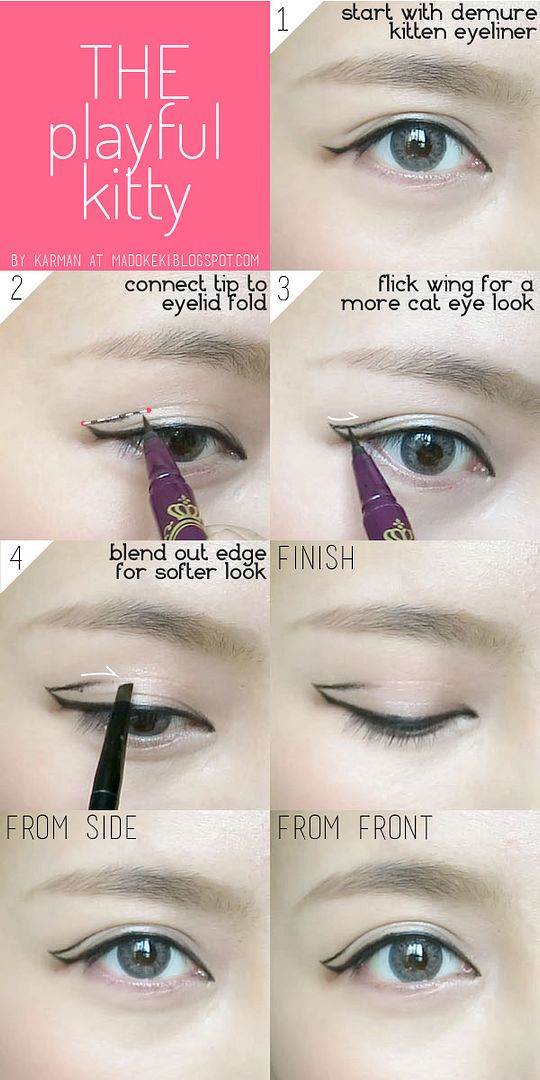
7. THE PLAYFUL KITTY EYELINER
i thought this is a really awesome way to try out the full on cat eye liner safely - by wearing it's outline. starting with the demure kitten eyeliner, you can connect it to your eyelid folds (or any where you deem suitable if you have single eyelid) to create the cat eyes look but without the boldness. i usually wear it with a colourful eyeshadow so it looks more fun that way!
click on image to enlarge!
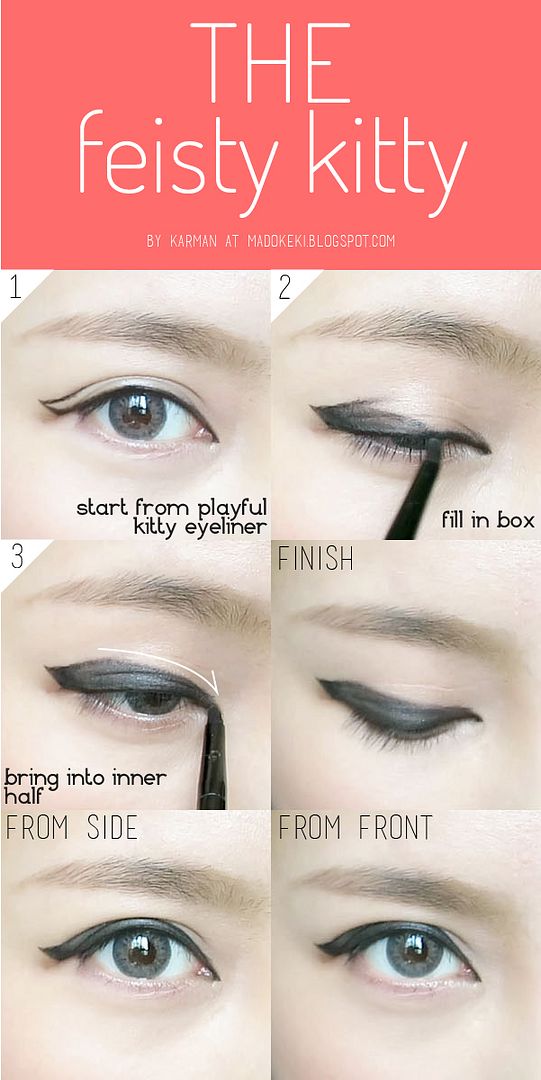
8. THE FEISTY KITTY
after getting the outline, the natural progression is to.. fill it up. and there you have it, a super bold cat eye. not for the faint hearted.
click on image to enlarge!
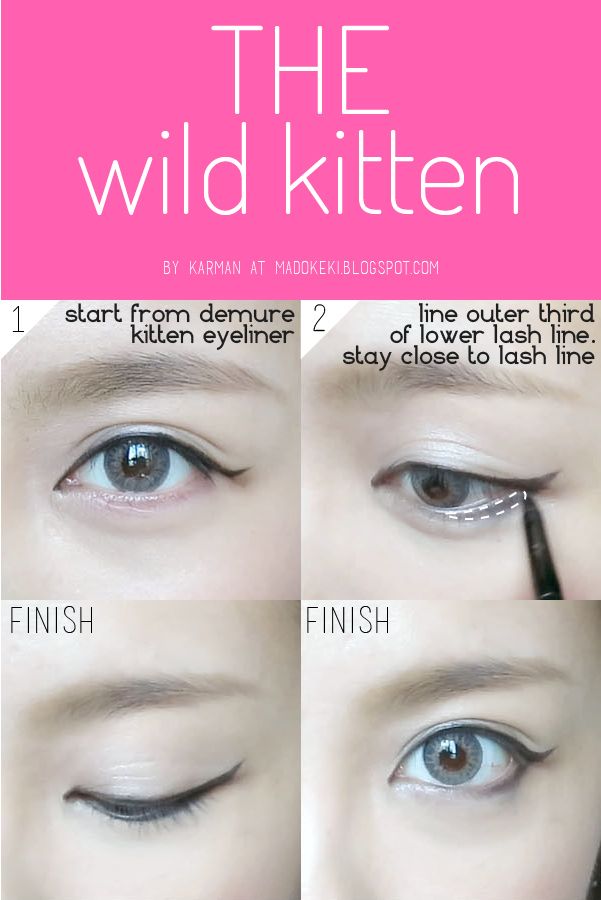
9. THE WILD KITTEN
if heavy and bold eyeliner ain't your cup of tea, let's tone it down to a more readily acceptable cat eye look. this is a variation of the demure kitten eyeliner - you line the outer third of the lower lashline too. just make sure to stay close to the lash line so as to retain the shape of your eyes.
click on image to enlarge!
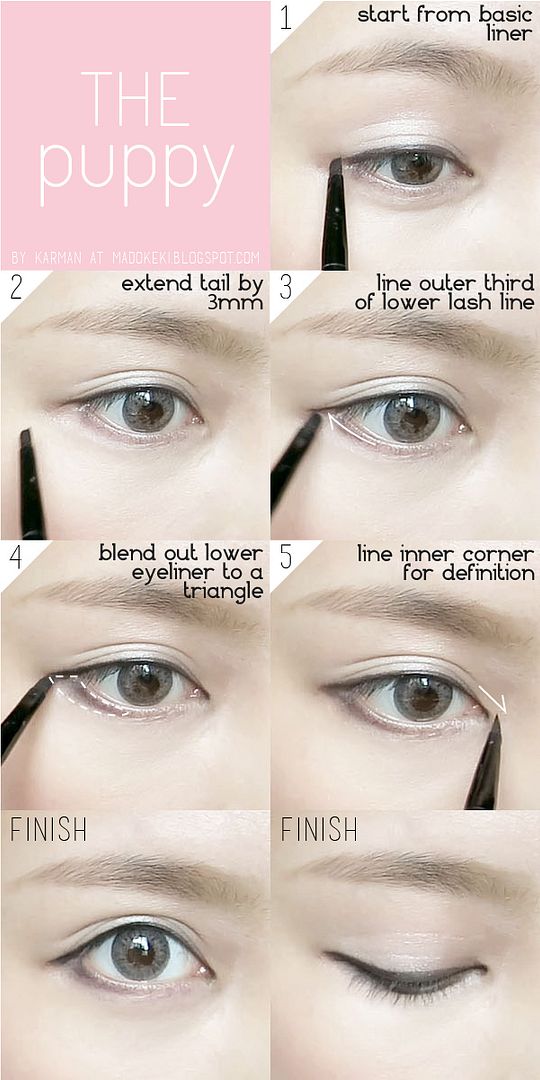
10. THE PUPPY EYELINER
last but not least, the innocent puppy eyes. puppy eyes just mean droopy looking eyes, so we'll go all out to achieve that. starting with extending the tail of the eyeliner downwards, and to shade the outer third of the lower lash line to add on to the droopy effect. by shading that triangular area, it will "pull" your eyes down visually. don't forget to define the inner corners or your eyes may look like they got pried apart.
i don't recommend people with naturally droopy eyes to try this look, it may make you look overly sad.
click on image to enlarge!
that's all i have to offer this time round! hope you found it useful :) it's fun to try more things! i used to be the type who stays in my comfort zone when it comes to making up, but it's through trying new things that i learnt about more looks that will suit me too. i've also learnt a lot more about my own features and what should i do/avoid.
experiment with some of them and let me know how it went for you! if you tried this look out, take a photo, share it on instagram and tag me @madokeki, because i'd love to see your version of it! remember to always tweak the makeup looks to suit yourself!
which is your favourite eyeliner look?
xoxo
karman


No comments:
Post a Comment